Have you ever had difficulties creating a new feature class for ArcGIS Online?
Have you ever had to…
- Create a CSV to upload to ArcGIS Online to create an empty feature layer?
- Create a shapefile in the desktop to create an empty feature layer?
- Ask a friend how to create a feature layer for ArcGIS Collector within ArcGIS Online?
ArcGIS for Developers provides the power to create advanced mapping applications with APIs, SDKs, and REST services. This complete mapping and location analytics platform is expanding upon the creation of new feature services for ArcGIS applications. Original feature service generation required creation in ArcGIS Desktop, followed by an upload to ArcGIS Online. The New Layer feature offers a simple method to create ArcGIS Online feature layers.
Create ArcGIS Online Feature Layers
Follow our step-by-step example of a new feature layer creation for a few Red-tailed Hawk sightings in Colorado.

Start the new feature layer creation process by viewing the dashboard of your ArcGIS Online account. Sign in and click “View Dashboard” from the ArcGIS for Developers homepage, on the left side of the screen. The following page outlines all your creation and editing options, from starting a new app or web map, to diving into ArcGIS DevLabs for tutorials on building mapping apps with ArcGIS APIs and SDKs. To create a new feature layer, we’ll choose the “New Layer” option.

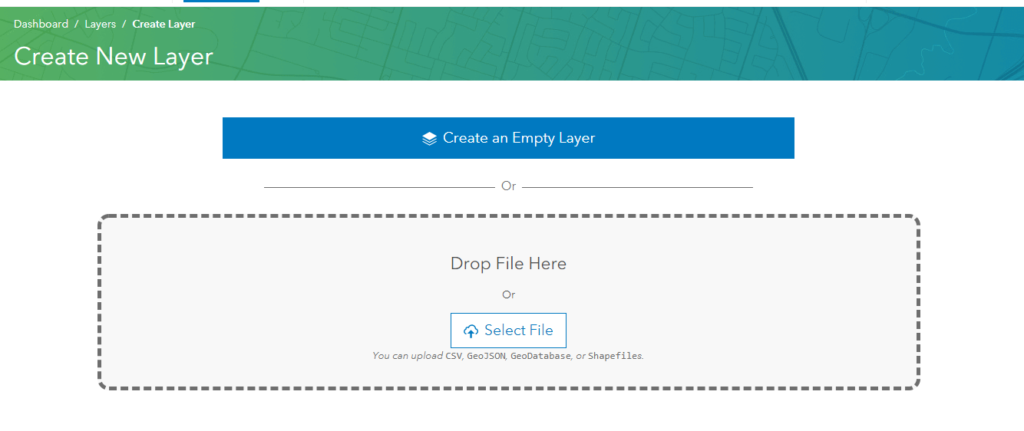
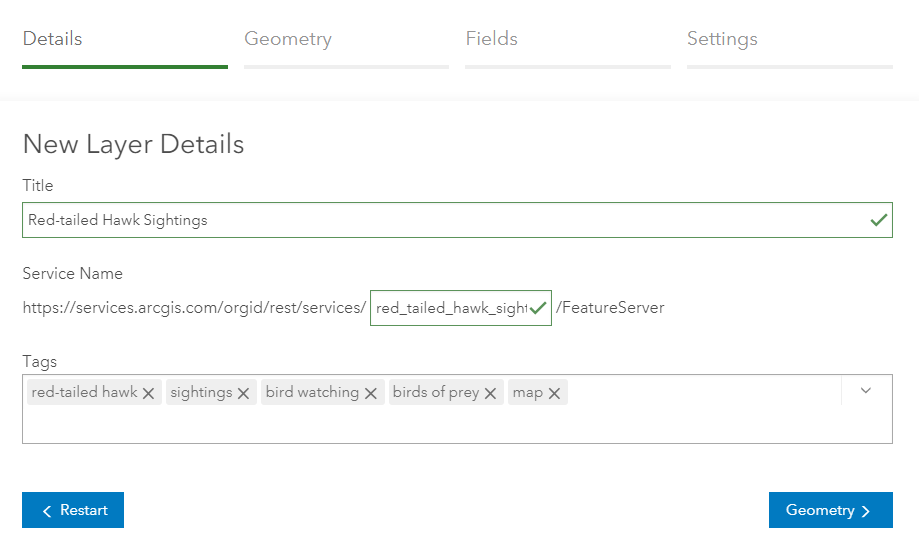
It’s time to upload a file (CSV, GeoJSON, GeoDatabase, Shapefile) or create an empty layer. To create a brand new feature layer we’ll select “Create an Empty Layer”. A new layer is only as good as its details. Input a title specific to what the layer will be used for, and add appropriate tags. Read more on the effective use of tags. The service name will be automatically generated as you enter the title name. Once we’ve entered the desired text and tags, it’s time to determine which type of geometric features will be stored in the layer.
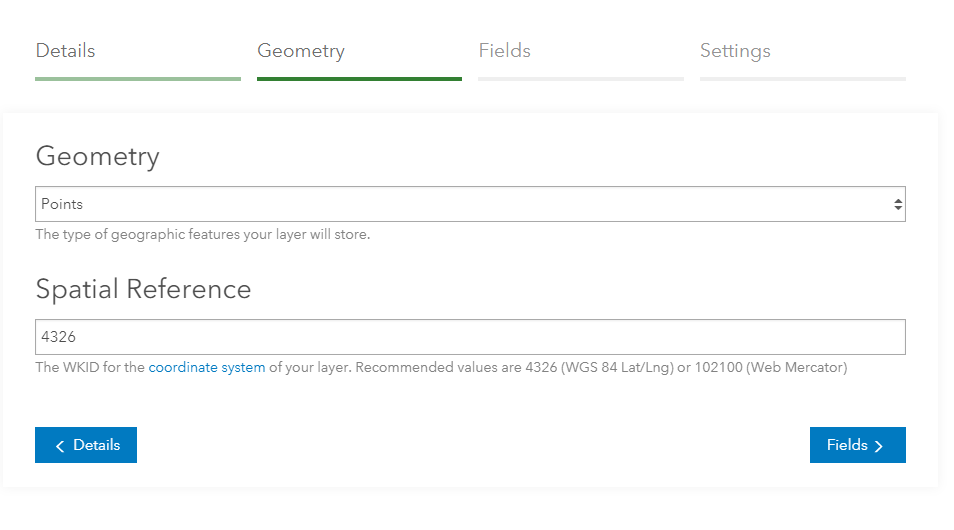
Choosing the ideal geometry type for the layer will depend on what type of data will be collected and displayed in the final product.
- Point features are best used for marking features with a single location, like trees, storm drains or the location of a Red-tailed Hawk sighting.
- Line features are best for collecting and marking features that span beyond a single point, like roads, pipelines, fences, or trails.
- Polygon features are advantageous when collecting features possessing an area, like building areas, property boundaries, or neighborhoods.
Determine an appropriate spatial reference for the layer. By default, WGS 84 Lat/Lng will auto-populate as a recommended value. Learn more about map projections and transformations. The locations of Red-tailed Hawk sightings call for point features, and we’ll stick with the default WKID for WGS 84 Lat/Lng.
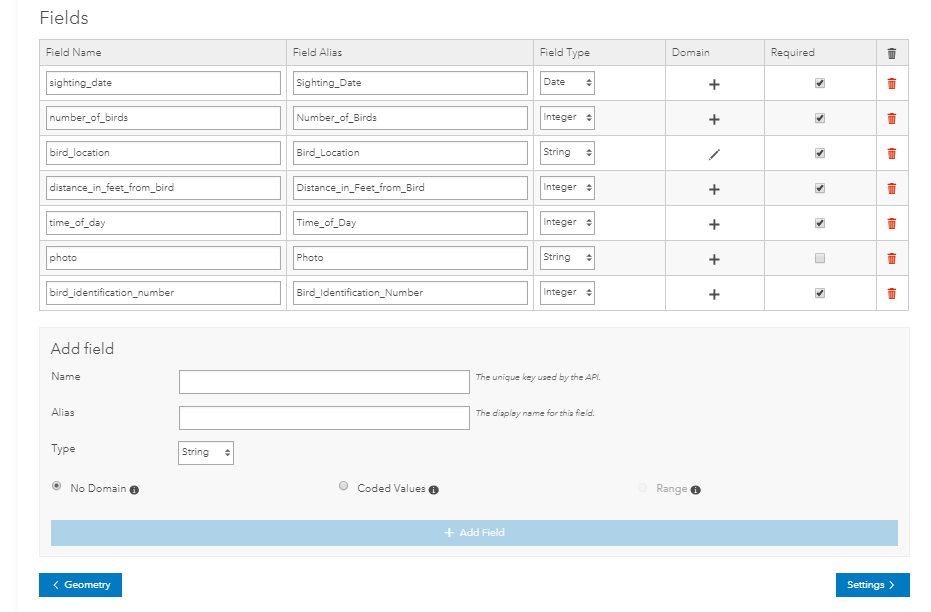
Use the Fields tab to add fields to the feature layer. Enter an appropriate field type and alias, and choose the most suitable field type (String, Integer, Double, Date) for each field. Each added field can be built with coded values, a set range of allowable values, or have no domain at all. Fields may also be added or changed later on, so no need to worry about forgotten field values or types.
- No Domain – Domains restrict the allowed values for fields
- Coded Values – Restrict field value to a fixed list
- Range – Restrict field values within a determined range (type cannot be string)
As we’re intending to attach a photo for each Red-tailed Hawk sighting, it’s important to check the first box under attachment settings. This will allow images and other files to be attached to individual features. How you share the feature layer depends on how you plan to use it, and what information will be stored there. Share the layer publicly, with specific groups and organizations, or keep it completely private.
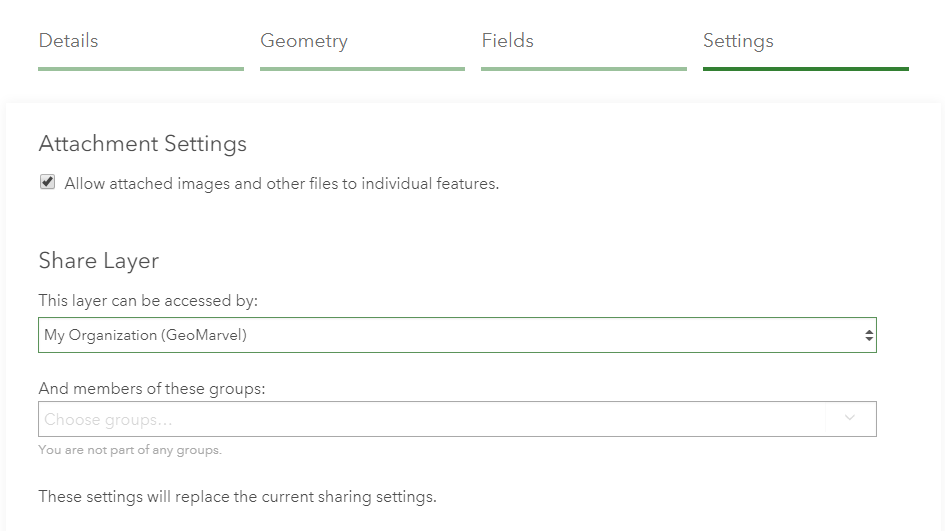
Based on how you intend to use this new feature layer, it’s important to consider the permission settings. Keeping track of creations and feature updates can be a valuable ally in monitoring data changes throughout a project. A reliable data connection may not always be available while collecting Red-tailed Hawk sightings in the field, but enabling sync will empower the feature layer to be edited offline.
Enabling editing will allow for use in editor apps such as…
- ArcGIS Collector
- CrowdSourced Story Maps
- Web Apps and Maps
- ArcGIS Online data collection configurable apps

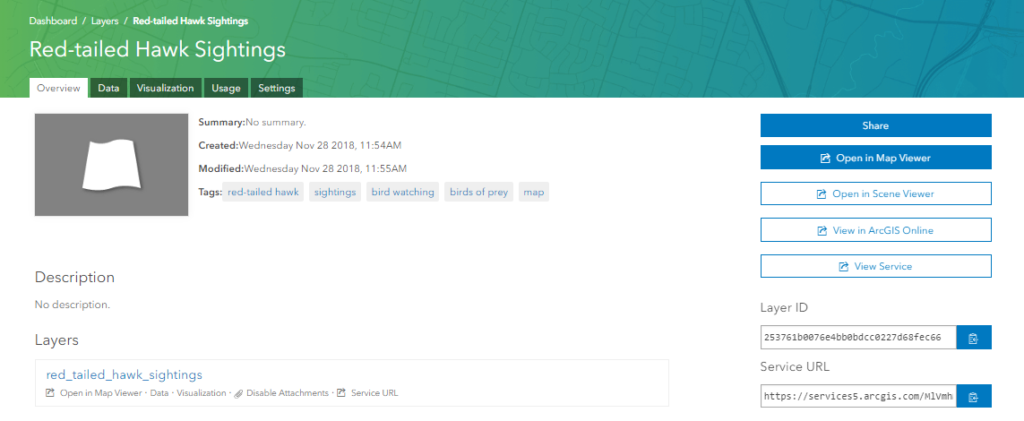
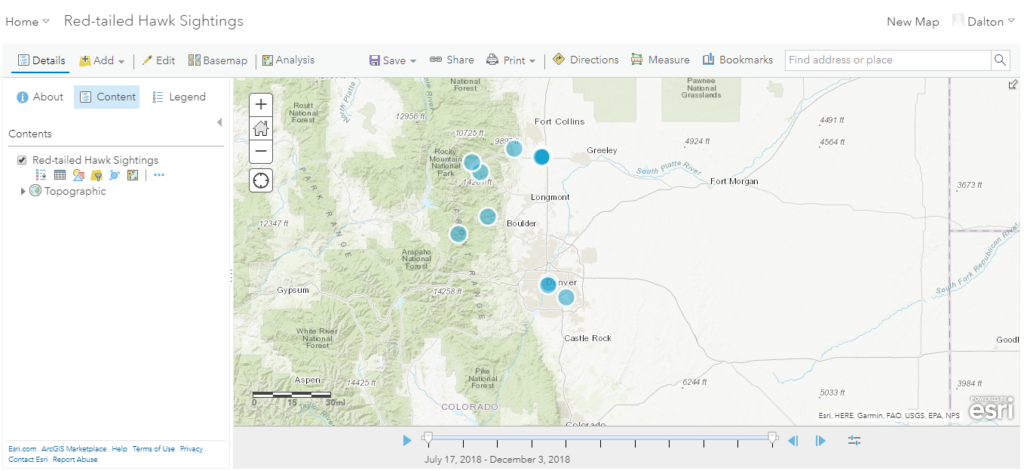
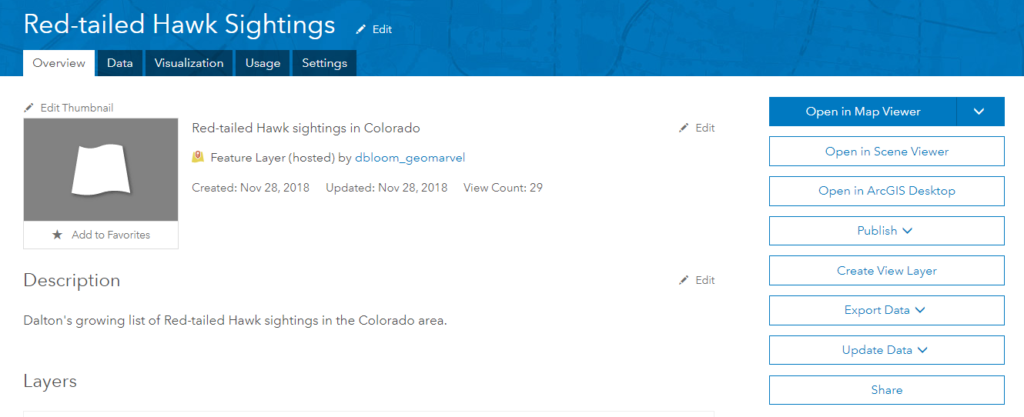
Now that you’ve created a new feature layer, it’s time to add details and gather data. The overview page outlines all the major details of your layer, providing various options, including viewing the layer in ArcGIS Online, or a Map/Scene viewer.
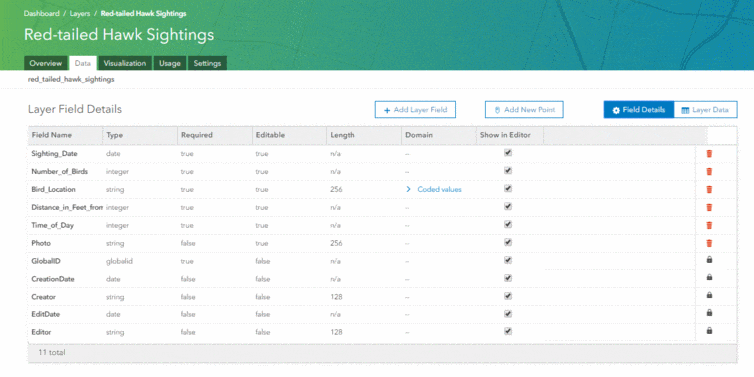
The Data tab offers layer and field details, and the ability to add layer fields, or add new polygons, lines, or points (based on the selected geometry type). Give your feature layer more details by adding new points, updating, deleting, or editing existing records to get every map and data detail exactly how you want it. Add or edit field details and layers on-the-fly with quick access under the Data tab. View a table of all the layer’s fields and features within the “Field Details” option. The overview tab provides a map preview of your data. For our example, it outlines the locations for the collected Red-tailed Hawk sighting data points.
The visualization tab shows a side-by-side code view and map. This is the JSON visualization of that feature layer. Clicking on a point will generate a pop-up display outlining all of the point’s details. Browse through all your data points, lines, or polygons to see how a JSON query will pull your data.
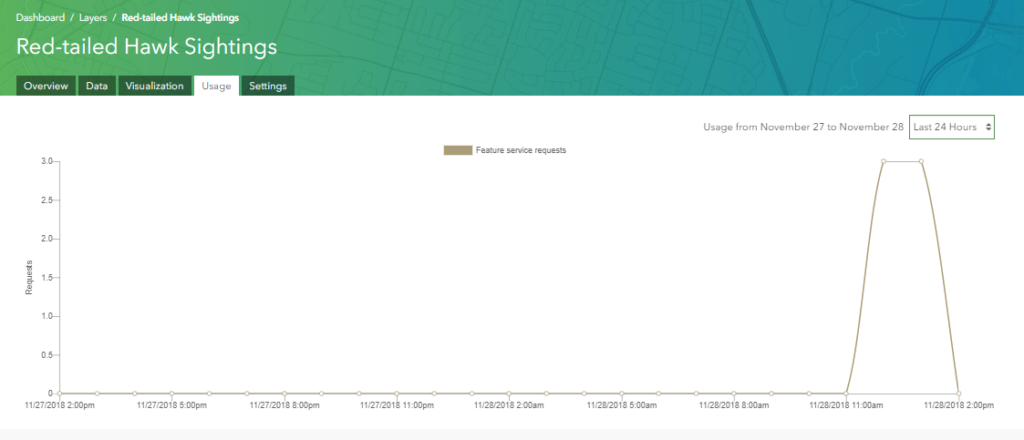
See all interactions with the feature layer from the “Usage” tab. The graph is monitoring every request made on the data. Each click, pan, zoom, or scroll will generate a web request that gets tracked and graphed, so feature layer usage is clear as day.
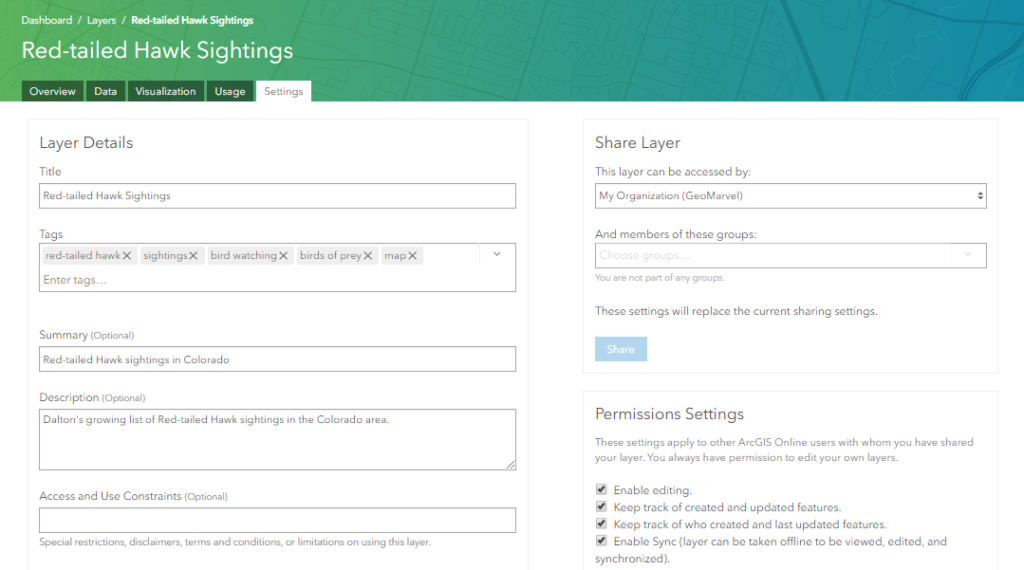
Finalize the title and tags, then add a short summary and description that explain the purpose of the layer. Optionally, credits and access/use constraints can be applied to further detail the layer. All sharing, permissions, and timing settings are accessible along the right hand side of the screen.
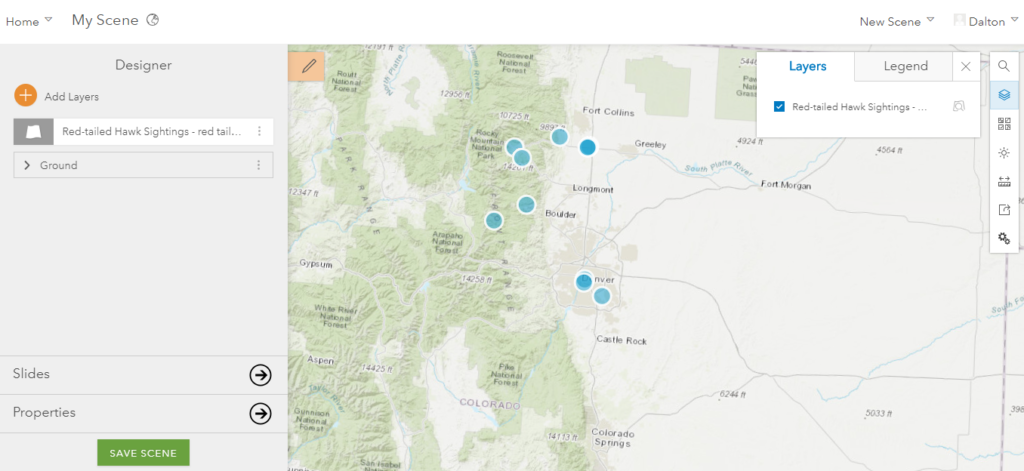
Your layer is now accessible via Map/Scene Viewers and ArcGIS Online. View the layer from Map or Scene Viewers or via ArcGIS Online. Share your data and collaborate with others after leveraging this streamlined method to create ArcGIS Online feature layers.
Layer Creation Simplified with ArcGIS for Developers
Welcome to your streamlined method for new feature layer creation from ArcGIS for Developers. Want to learn more about this new method? Reach out to our GIS & development experts to start leveraging this new tool today.