Discover the power of Microsoft Flow as a system to integrate various programs and applications. Browse all the available templates within Microsoft Flow here, or create your own. This tutorial will walk through the process of a simple integration of Survey123 with Microsoft Flow.
Tutorial: Automating email alerts for completed Survey123 forms
Create a form in Survey123 with the desired information. Thinking ahead, consider which items you’d like to automate within Microsoft Flow. What details can be gathered at the first point of contact with a potential customer? Let’s dive in. First off, create a form in Survey123 with the desired information, naming the form appropriately.
When providing the form details, consider what information would be most relevant in the automation process. In this example we’ll grab the user’s first and last name, their desired appointment type, and their email address.
Now let’s connect this Survey123 form with Microsoft Flow. From the Microsoft Flow homepage, select the “My Flows” tab, select “New”, then “Create from blank” to begin creating a new flow.
From a blank flow, begin by connecting to the desired Survey123 form. Connecting to the form will allow you to easily integrate dynamic content from completed forms. First, let’s create a trigger by linking to Survey123 and choosing the “When a survey response is submitted” option. Then choose the appropriate Survey123 form from the dropdown menu. Click “New Step” to determine what will occur once the designated Survey123 form is submitted. In this example, we want an email notification that’s populated with dynamic content from the completed Survey123 form.
The email subject text will remain the same in each instance, but let’s incorporate some dynamic content into the body text. Let’s include the “feature_appointment_type_requested”, which will be one of the three options we created in the Survey123 form. Add in “feature_first_and_last_name” so we know who requested this appointment. And finally, include “feature_email_address” so we have a way to contact that individual about their appointment.
Now let’s save the flow, then test it out by clicking the “Test” button in the top right corner of the window. Choose “I’ll perform the trigger action”, click “Save and Test”, then navigate to the created Survey123 form to test out your new flow.
Fill out the form with example content to test out the flow, and ensure everything comes out as expected. Type in a first and last name, choose an appointment type, enter an email address, then click “Submit”.
After submitting the example form in Survey123, quickly navigate back to Microsoft Flow to watch for the flow to run successfully.
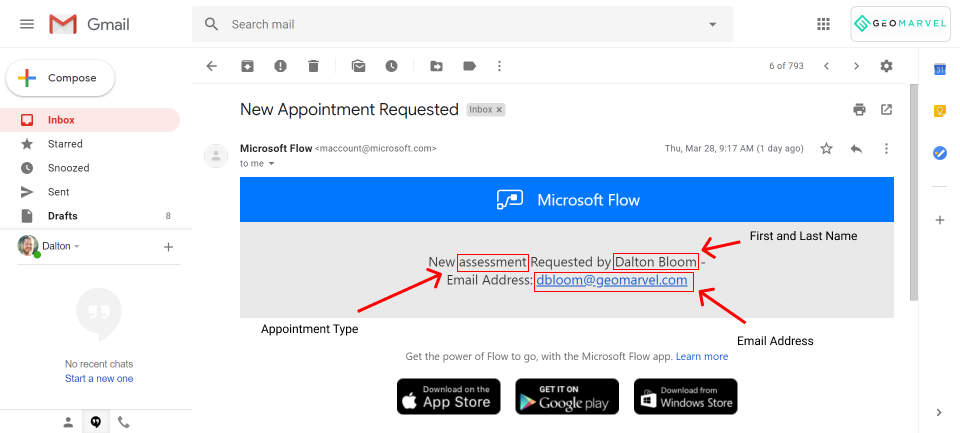
As expected, the successful flow triggered a new email in my inbox, indicating that the Survey123 form has been filled out. Let’s open the email to ensure all the dynamic content populated correctly.
![]()
There you have it. All the details input while filling out the form are now shown just as expected in the automated email, including the appointment type desired, the user’s first and last name, and their email address for easy follow up.
Get Support
This was a simple example of automating workflows with Microsoft Flow. Be on the lookout for more complex Microsoft Flow integrations in upcoming blog posts. Need assistance creating your own Flow? Reach out to our industry experts to start a conversation today.