Hub and Enterprise Sites
Both ArcGIS Hub & ArcGIS Enterprise Sites offer the framework for providing accessible web content. And designing your site with accessibility in mind, will provide the very best experience for the end user.
Enterprise Sites
Enterprise Sites is a new application as of ArcGIS Enterprise 10.6.1. The main goal of Enterprise Sites is to present your Portal with a friendly, non-GIS interface. The Sites application can be custom configured to connect with all your other sites, basically acting like a homepage. In addition to launching all your other Sites, you can also launch sub pages for those Sites from your homepage interface.

Use Enterprise Sites over ArcGIS Hub if…
– You work in a disconnected environment
– Your IT policy prohibits the use of ArcGIS Online
– You need control over the web server
When to Use ArcGIS Hub
Leverage Hub whenever you have the ability to use ArcGIS Online. Perks include zero credit burn, unlimited bandwidth downloads, and esri-hosted infrastructure. Hub outperforms Enterprise Sites in features and functionality, and it’s optimized for the web with built-in CDN and SEO.
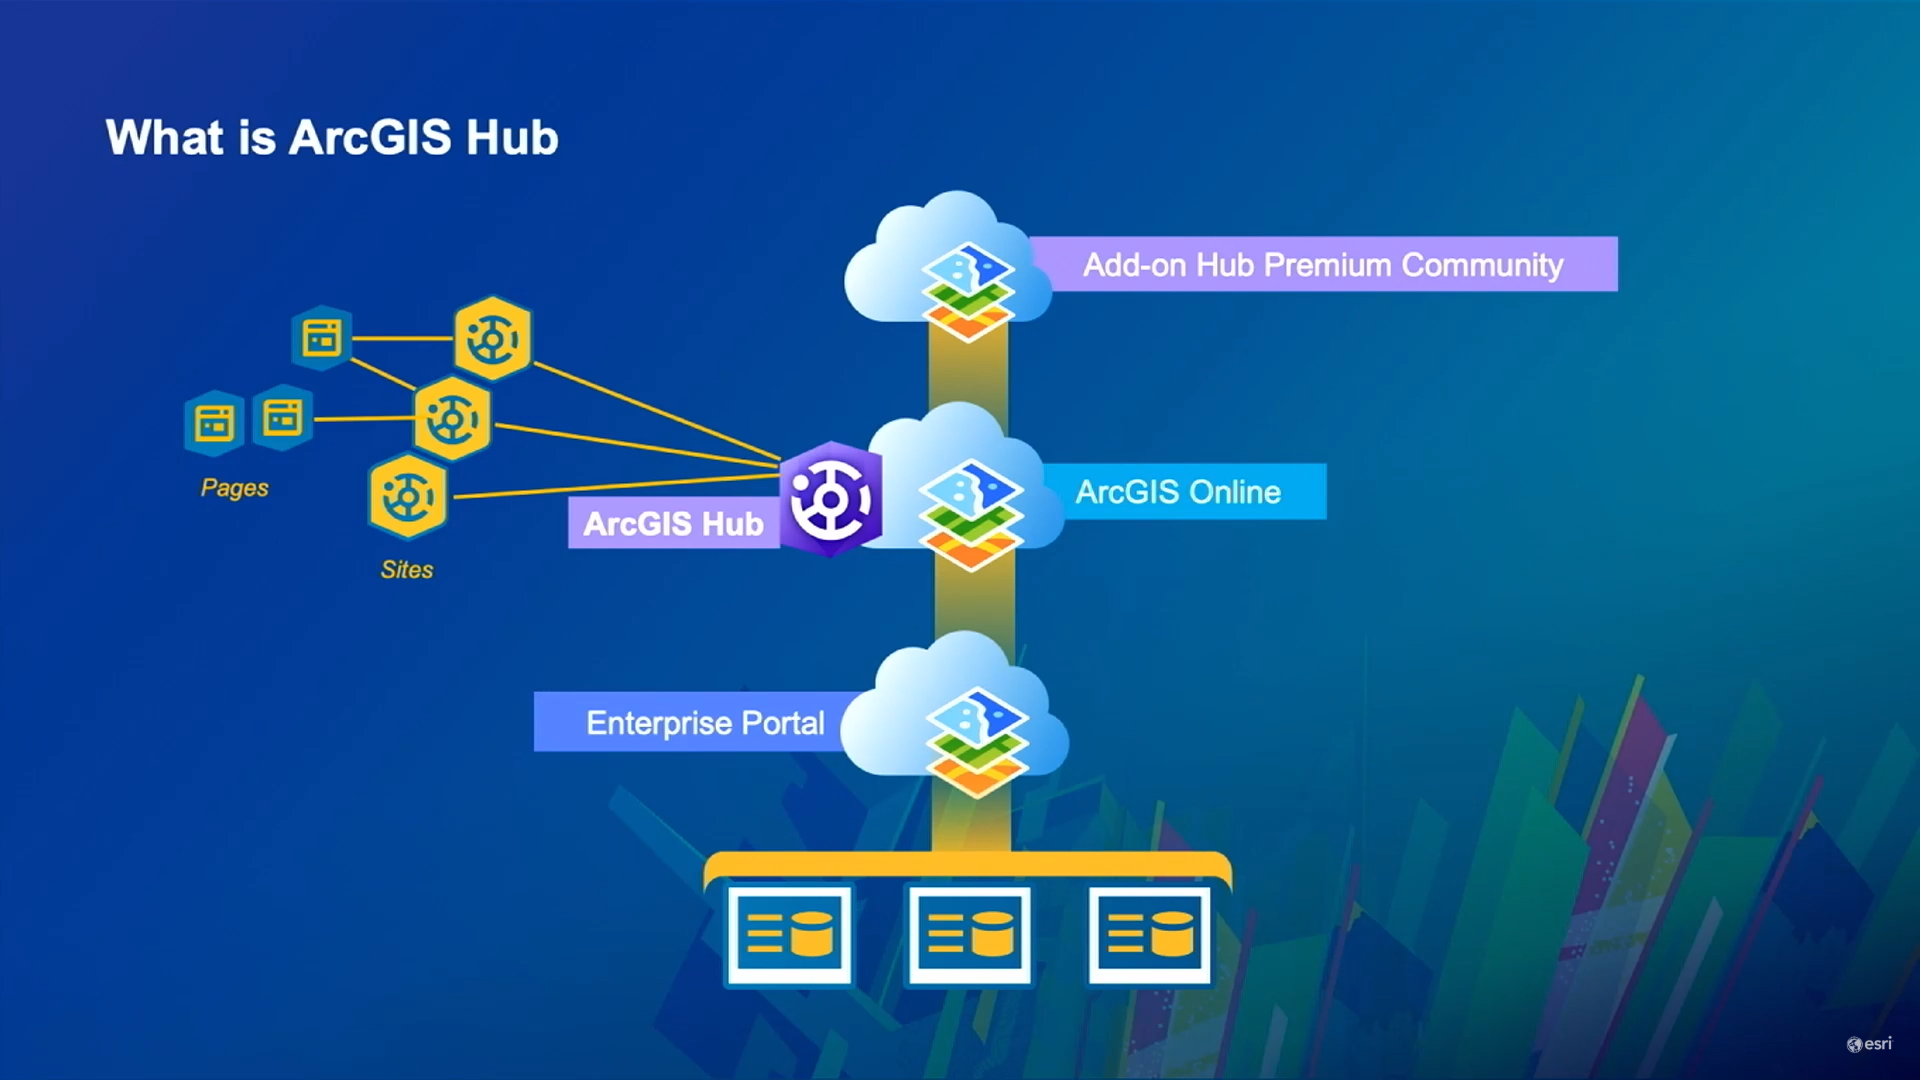
Hub comes with three additional sub-systems that are not available in Enterprise Sites:
1 – Custom domain (URL) support with generated HTTPS certificates
2 – An expanded download system and caching throughout the platform
3 – Improved search experience for end users
Creating a New Hub Site
From your ArcGIS Online account, click the app launcher and select Hub. Create new sites with the green button. Created Sites will show up in your content, and can be shared with people. When creating a new site, you’ll be prompted to select an existing open data group. You can also create a new group with open data access to use with the newly created Site.
Next, determine your Site name, URL, set your map extent, and choose your default basemap.
Now let’s create a new open data group to leverage with our new Site. Create a new group within your ArcGIS Online organization, giving an appropriate group name, summary, thumbnail, and tags. As you determine the group preferences, be sure to check the “Open Data” box at the bottom of the page. This will enable open data capabilities for your newly created group.
Add the new open data group to your new Site by simply clicking the “Add” button.
Design with non-GIS users in mind
You may create a separate site for each of the various aspects of your organizational structure. For example, an organization focused on environmental resources may have different sites for each area of focus – water, soil, vegetation, renewable energy, and green initiatives.
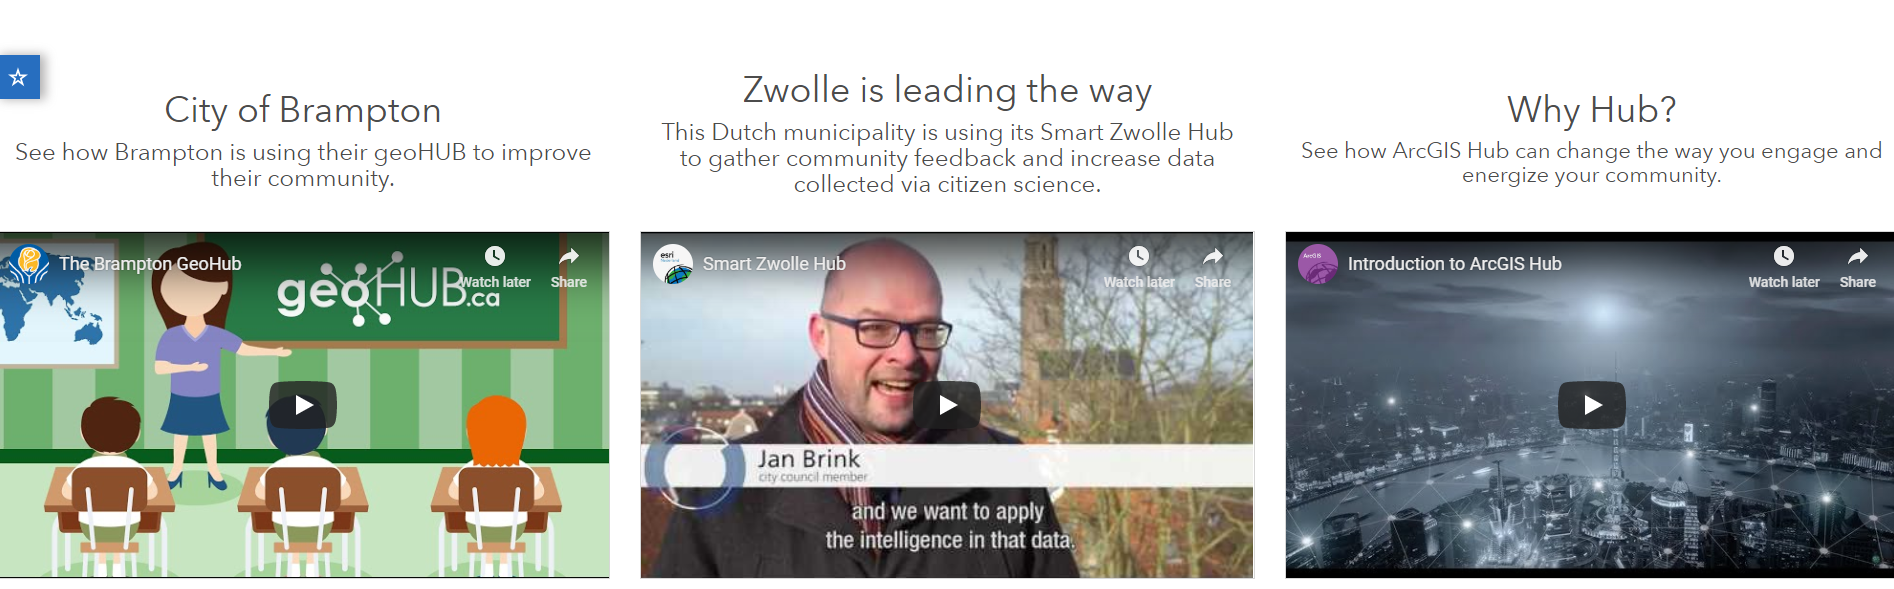
To link all these Sites together, a portal-wide site can be created to serve as the homepage, which provides an overview and links out to each of the other sites. With the same application technology available in ArcGIS Hub, you can draw inspiration from these showcase examples from Esri.
Build a Site Map
In order to drive your site map, there are two important questions to ask:
– How will this site fit into an existing organization site?
– Do you need a root site?
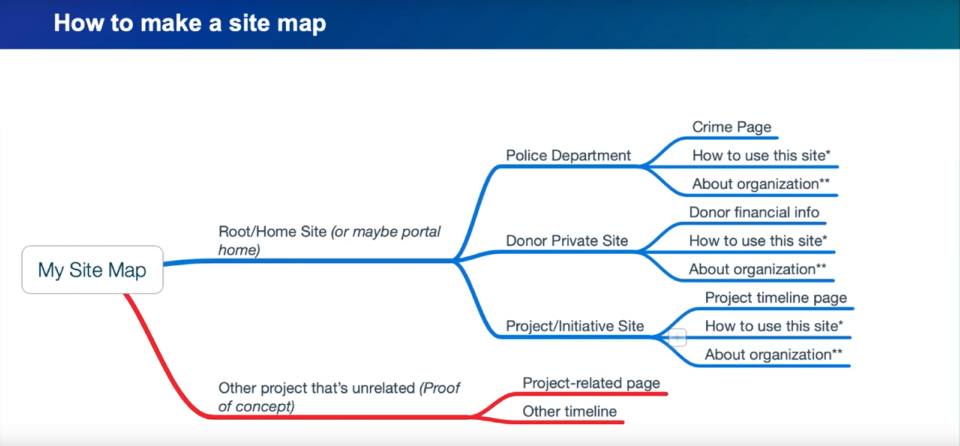
As each site is built for a different purpose, it’s a great idea to create and leverage one site that acts as a launch pad to all other sites (aka the root site). When using a custom site as your root site, you’ll have even further customization options within the site editor.
In addition, each site has the ability to have its own custom pages. These pages can be unique to a given site, or can be duplicated for use throughout all of your sites. Duplicate pages may be useful when creating a generic page describing how to use a site, as the bulk of the text and content may remain the same.
Planning Your Site
Start small with a single site build. Test the waters and interact with the creation experience. Create your site so that users think it’s simply a website, rather than a complex system of record for geospatial information.
“Great Portals Make Great Sites” – Shannon Kalisky
Prepare the Data
Configure your data attributes so they clearly explain the data. Poor attribute titles can mislead the user, or simply leave them confused and left with unusable data.
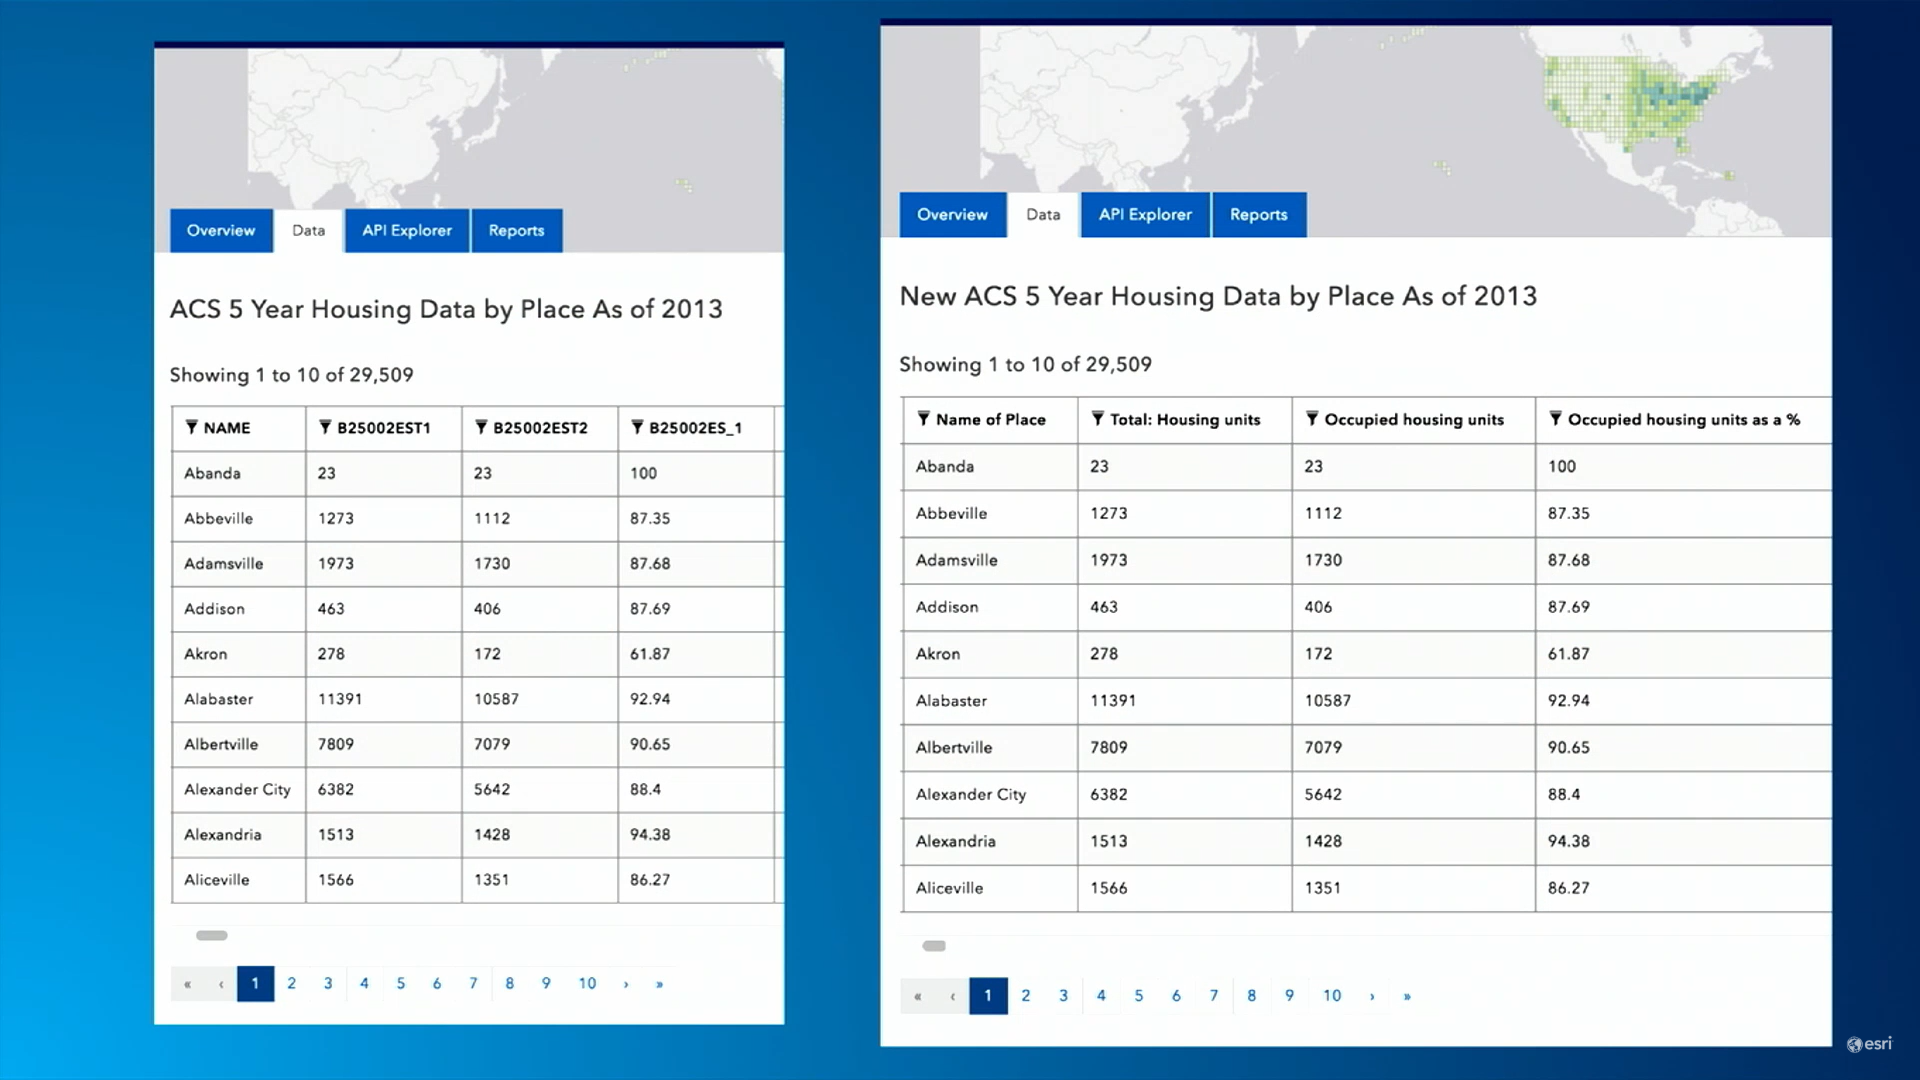
It’s advised to turn on editor tracking to keep tabs on any updates or changes made to the data. Simplify to help the data load faster by reducing the overall number of vertices. Both Hub and Sites are best optimized for Server 10.5 or newer.
Setup Hub in ArcGIS Online
Setting up Hub in ArcGIS Online only requires an admin. Enabling open data may seem scary, but does not share any of your data publicly, as all of your sharing settings remain the same even after enabling open data.
1 – Enable open data in your organization settings
2 – Create a role in your organization that is a Publisher Plus
A – Make groups available to open data
B – Create group with update capabilities
C – Manage open data site(s)
3 – Assign non-admin members of your organization to the Role you just created
4 – Visit the Hub admin application to add members of your organization to the Team tab
Setup Enterprise Sites
1 – Click the Sites app launcher tile
2 – Assign non-admin members of your organization to the Team
3 – Optionally adjust your Portal configuration to remove the admin sites app launcher item
Hosted or On-premises?
When hosting data, online is typically better. Online offers advanced performance, gets better updates, and requires no effort to maintain. ArcGIS Online is a great resource for hosting large and popular datasets, or any data you’d like to have automatically translated into a file geodatabase.
Designing Sites
One way to maintain the same look and feel for all of your sites is to use the same header design throughout your sites. This will maintain a seamless experience for the end user, no matter which of your sites they’re exploring. Don’t be afraid to go above and beyond the default site template. Explore some other sites that have been created to get some ideas of what’s possible.
Don’t let your site go stale. Unmaintained sites left to fend for themselves will inevitably lose visitors and functionality. It’s good practice to update your site and take advantage of all the latest features, explore how everything looks in a mobile format, and swap out old featured content for new content. The “set it and forget it” mentality can prove problematic in the web sphere.
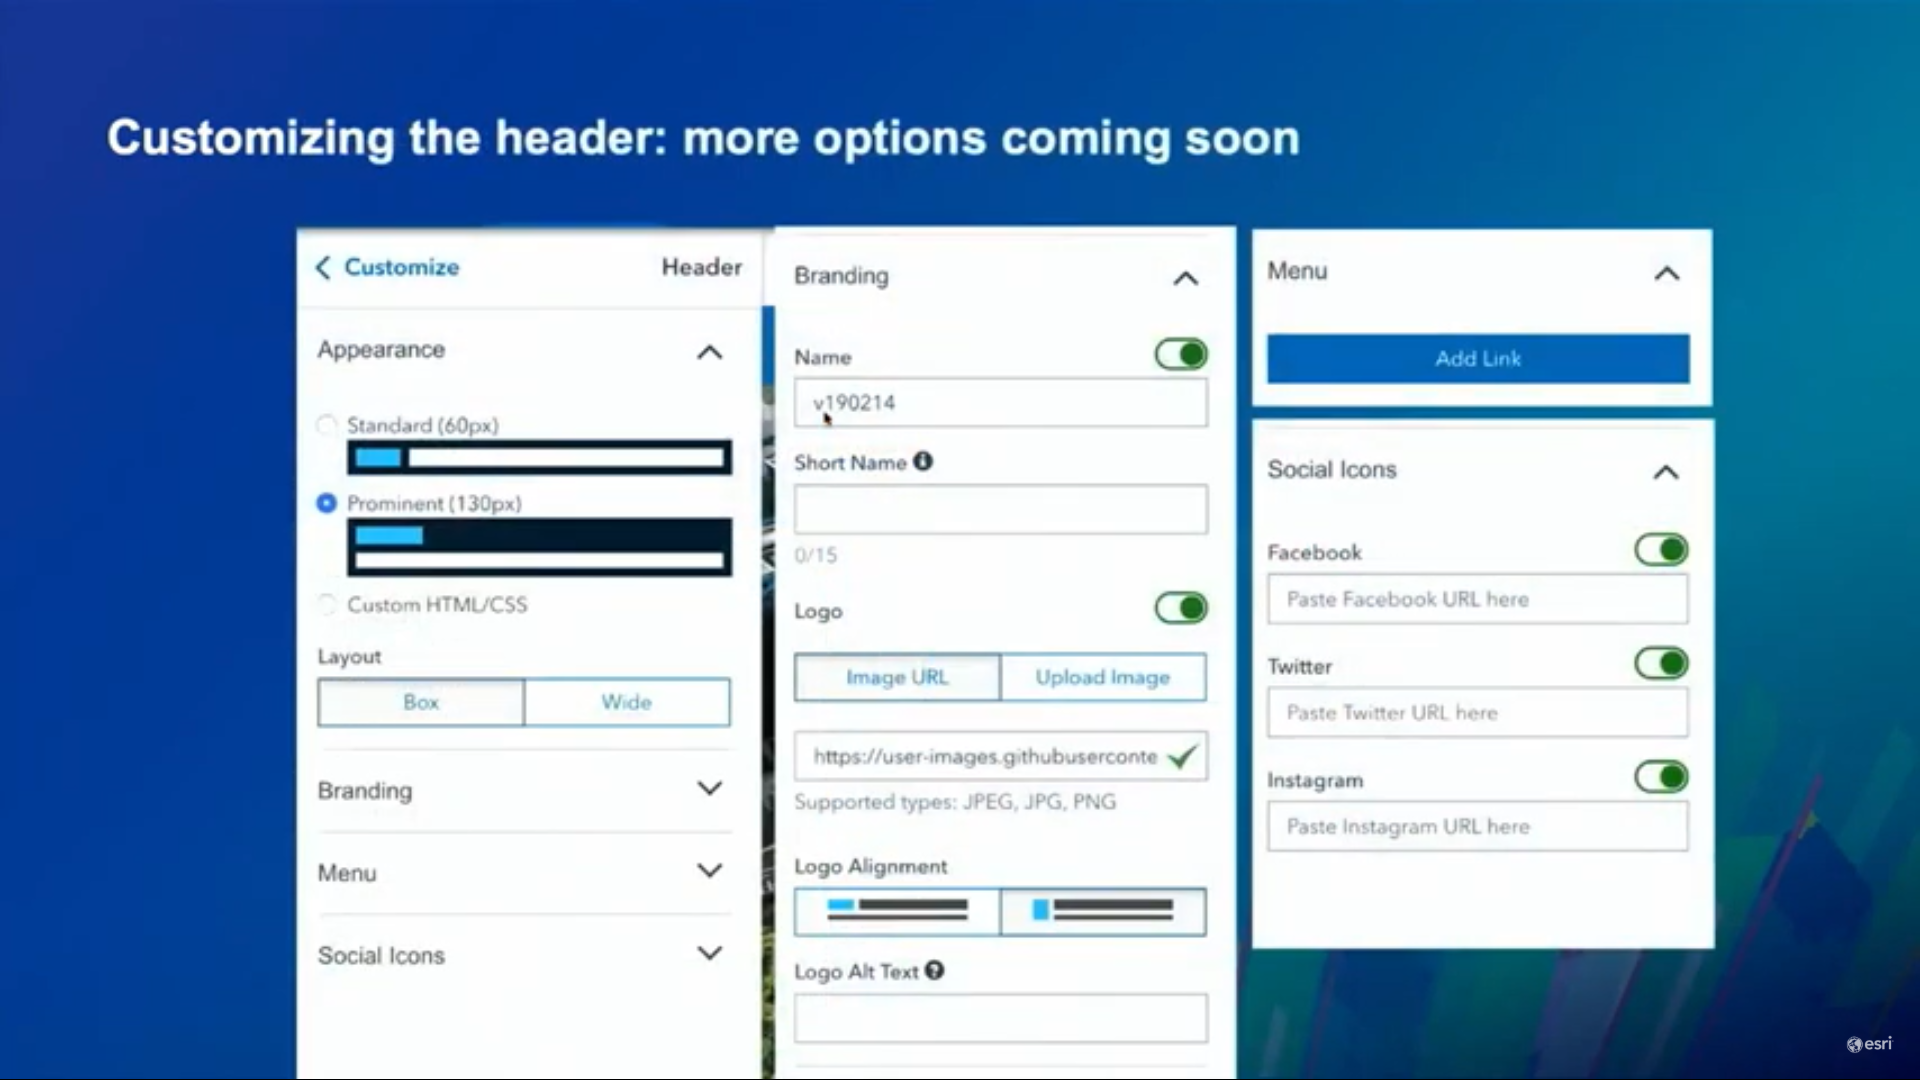
Designing your Header
Choose between basic and custom designs for your header. Basic headers keep it simple, only showing your organization’s logo and primary color theme. There’s no maintenance required for basic headers. Custom headers offer up HTML and CSS customization, but leave the maintenance and design to you. Be sure to create an effective, responsive design when creating a custom header, which are ideal for creating a unified design across all of your sites.
New Options for Header Customization (Available in 10.7.1)
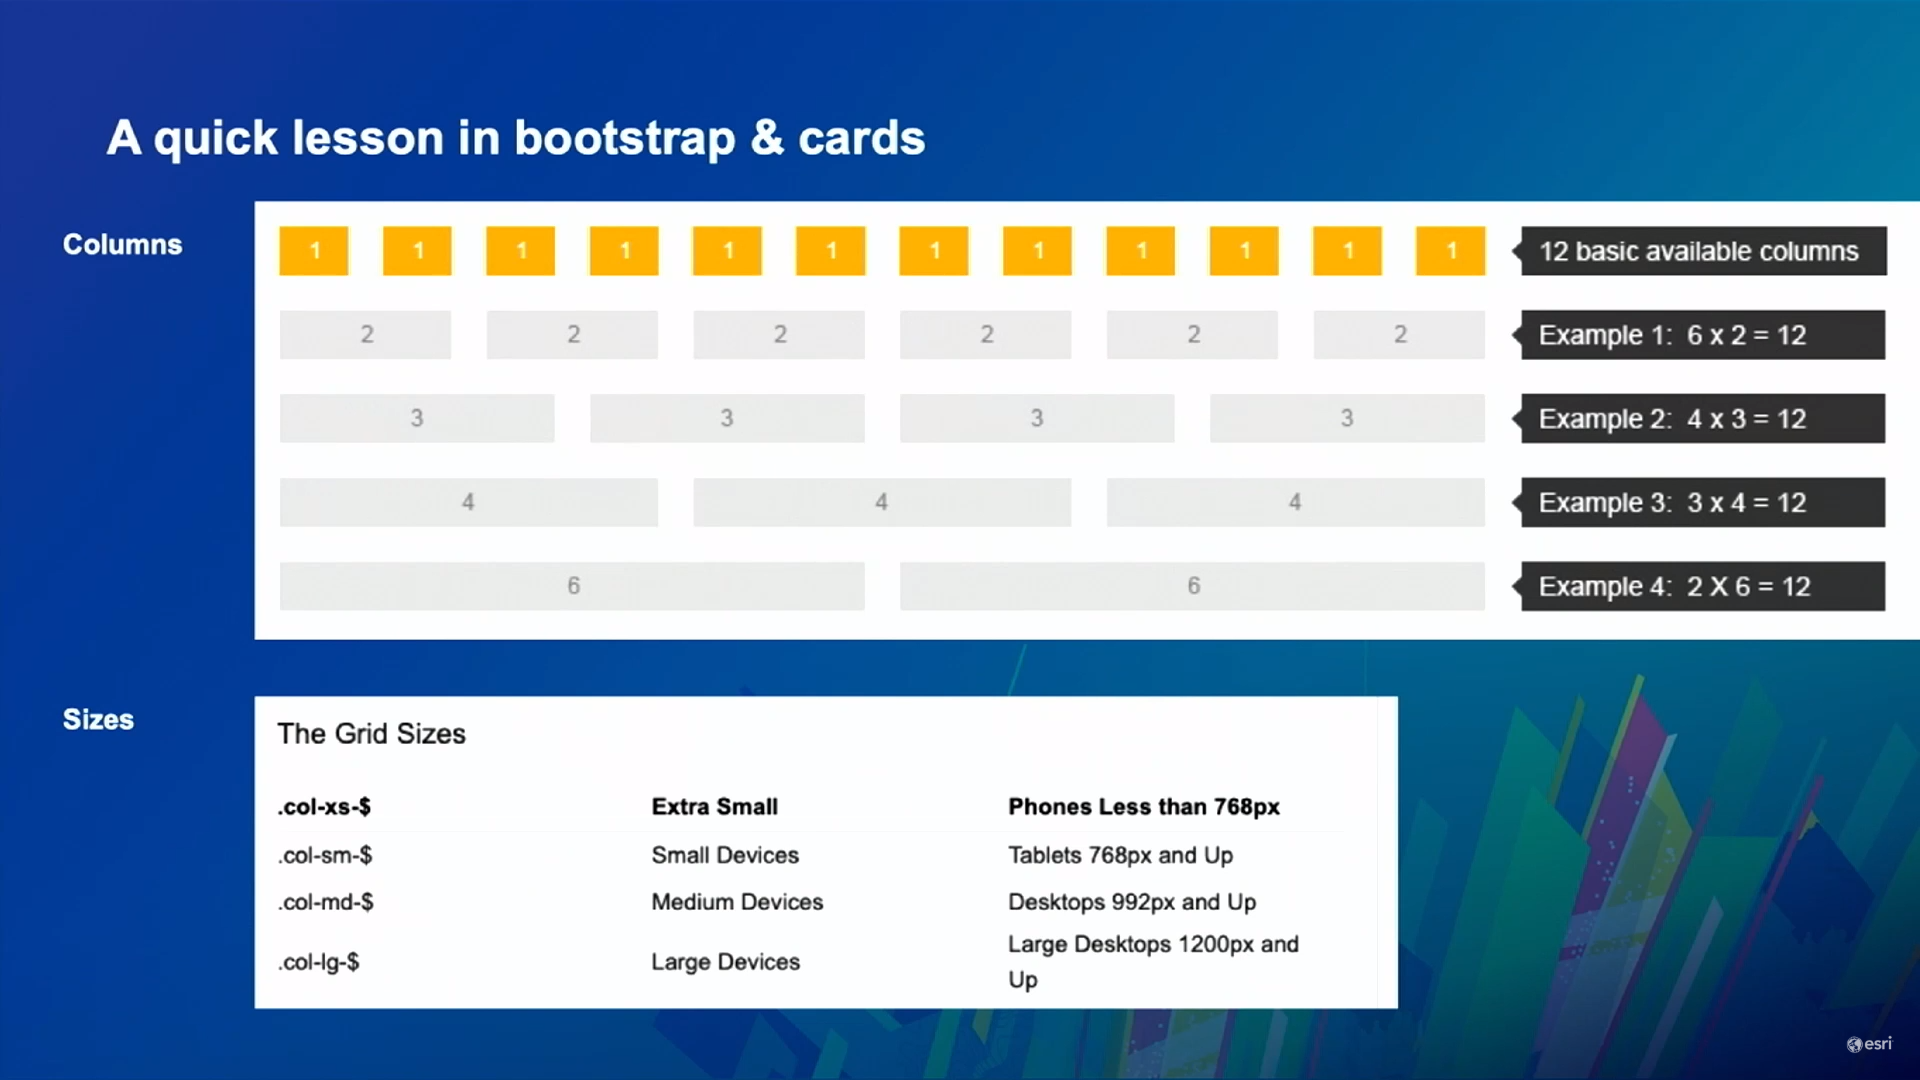
Site Design with Bootstrap
Bootstrap is a CSS framework that divides the page into 12 containers. This strategy helps with the sizing of text and object groups within a page, and influences how items resize on screens of various sizes. There’s a plethora of documentation on using Bootstrap. See further resources for custom HTML in Bootstrap.
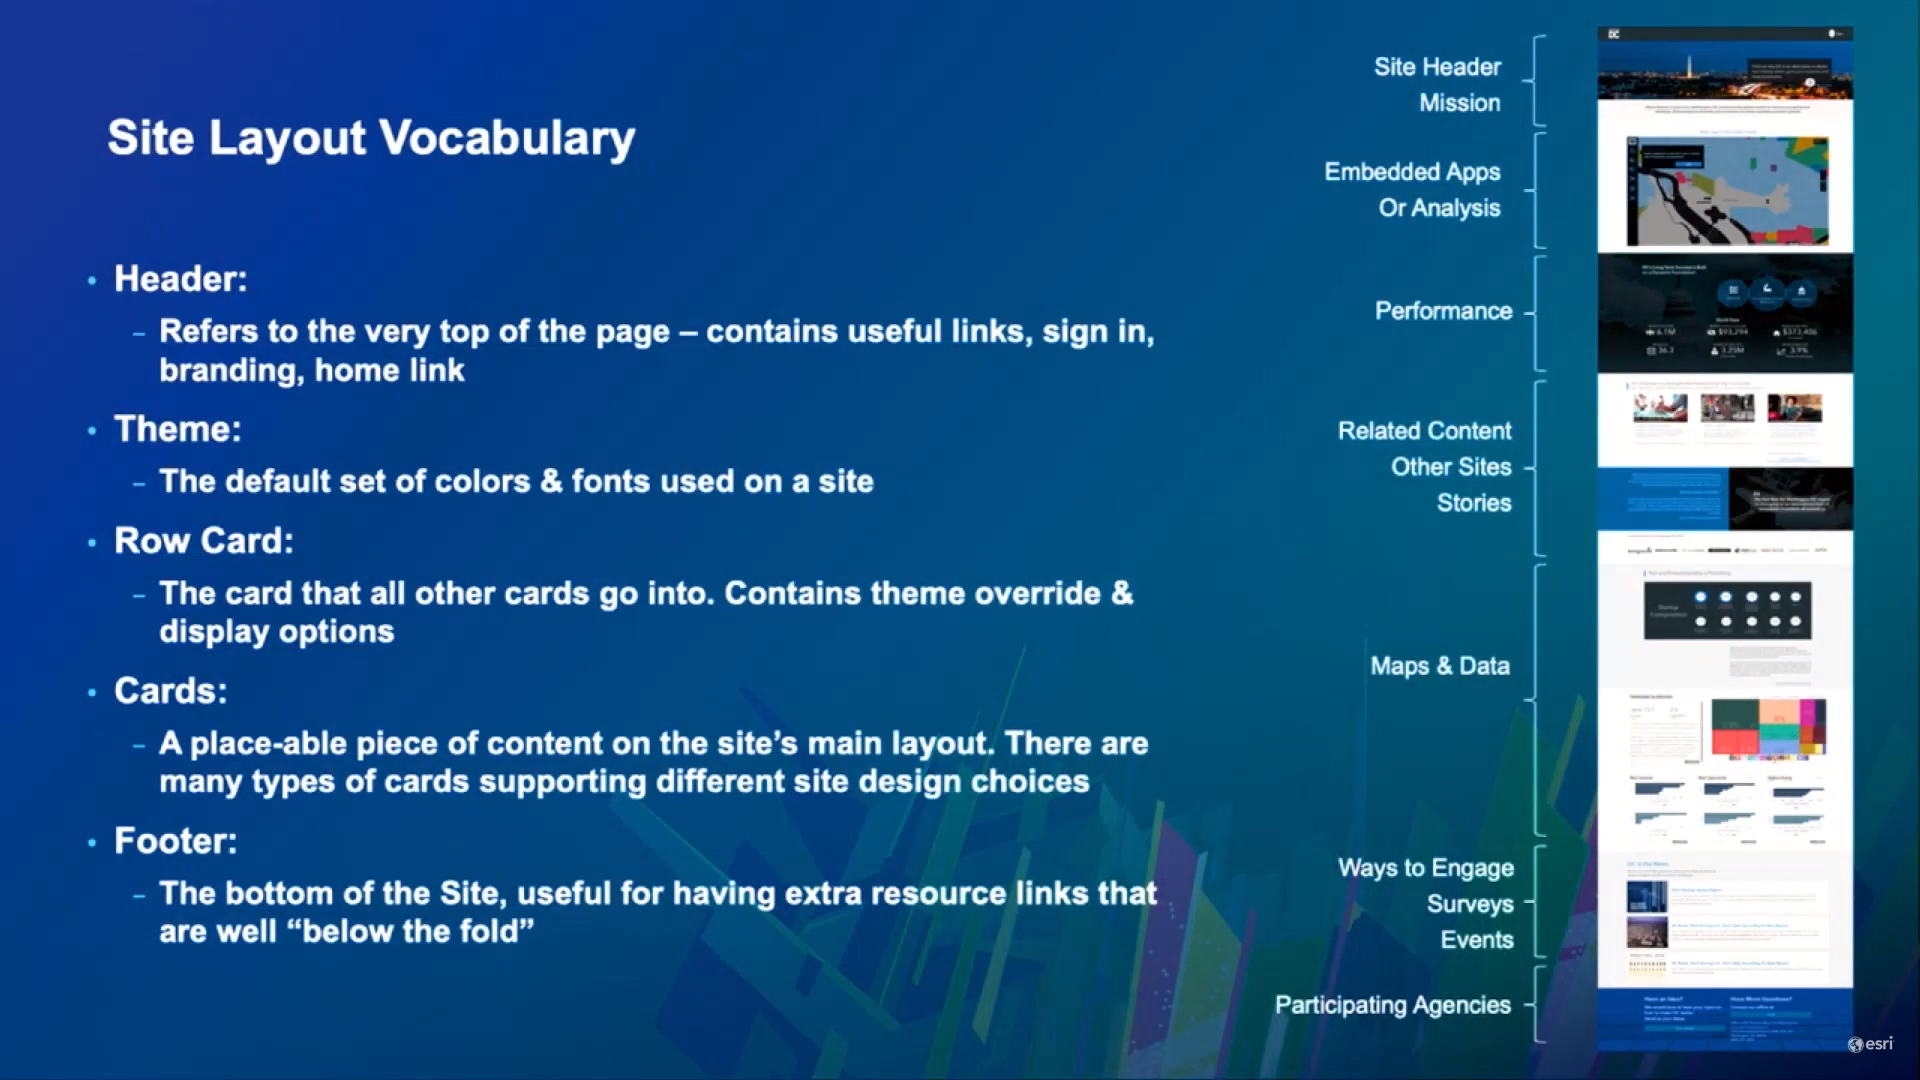
Getting to Know Layout Cards
Layout cards are configurable items that can be added to fully customize your site(s). When editing your site, simply drag and drop your chosen layout item to the desired location. Each card offers different features, let’s take a quick walk down layout card lane.
Row
Construct your site with row cards. Each row card can be filled with other cards like text, images and media. Choose between BOX and WIDE layout options.
Image
Upload images via URL or by choosing a file from your computer. Any images shared internally are solely viewable by signed in users that belong to your organization.
Banner
Banner cards are great for adding headers, subheaders and search bars to your site.
Text
Text cards allow you to add formatted text, tables, lists, or custom HTML to your site.
Category
Category cards work well to group datasets, allowing users to quickly browse your available content by relevant categories.
Contact Info
The Contact Info card simply provides users with your organization’s contact information, allowing them to call/email/message the data owner with questions and clarifications.
Web Map
The Web Map card will display web maps on your site. Any privately-shared web maps will only be accessible to those signed in users who belong to your team or organization.
Chart
The Chart card provides simple charts that portray your data. Or create your own custom chart by entering your own chart JSON. Charts containing privately shared data will only show up for signed in users within your organization.
Iframe
The Iframe card will embed iframes and other external resources. A word of caution: do not embed iframe code from other websites, simply paste the URL you want to embed.
Summary Statistic
The Summary Statistic card offers an at-a-glance view of key performance indicators surrounding your data. These statistics are generated from a dataset query, and automatically update with updated datasets, so no need to worry about misinformation.
Gallery
Here you can showcase apps, dashboards, datasets, sites, pages, web maps and documents. The Gallery card pulls items straight from your organization’s ArcGIS Online groups.
Search
Adding a search bar to your site enables users to quickly search for and find content on your site. Provide some placeholder text, like “Search by Keyword” or “Find Data”.
Video
Video cards will embed YouTube, Vimeo or Facebook videos on your site.
Social Media
Easily share your social media posts, tweets timelines directly on your site by referencing your social media URLs.
Looking to customize further?
Check out this Site Customization page from ArcGIS Hub. Explore other card variations from the Esri GitHub page. And for an in-depth review of these cards with additional directions for how to use them, be sure to visit the layout card documentation provided by esri.
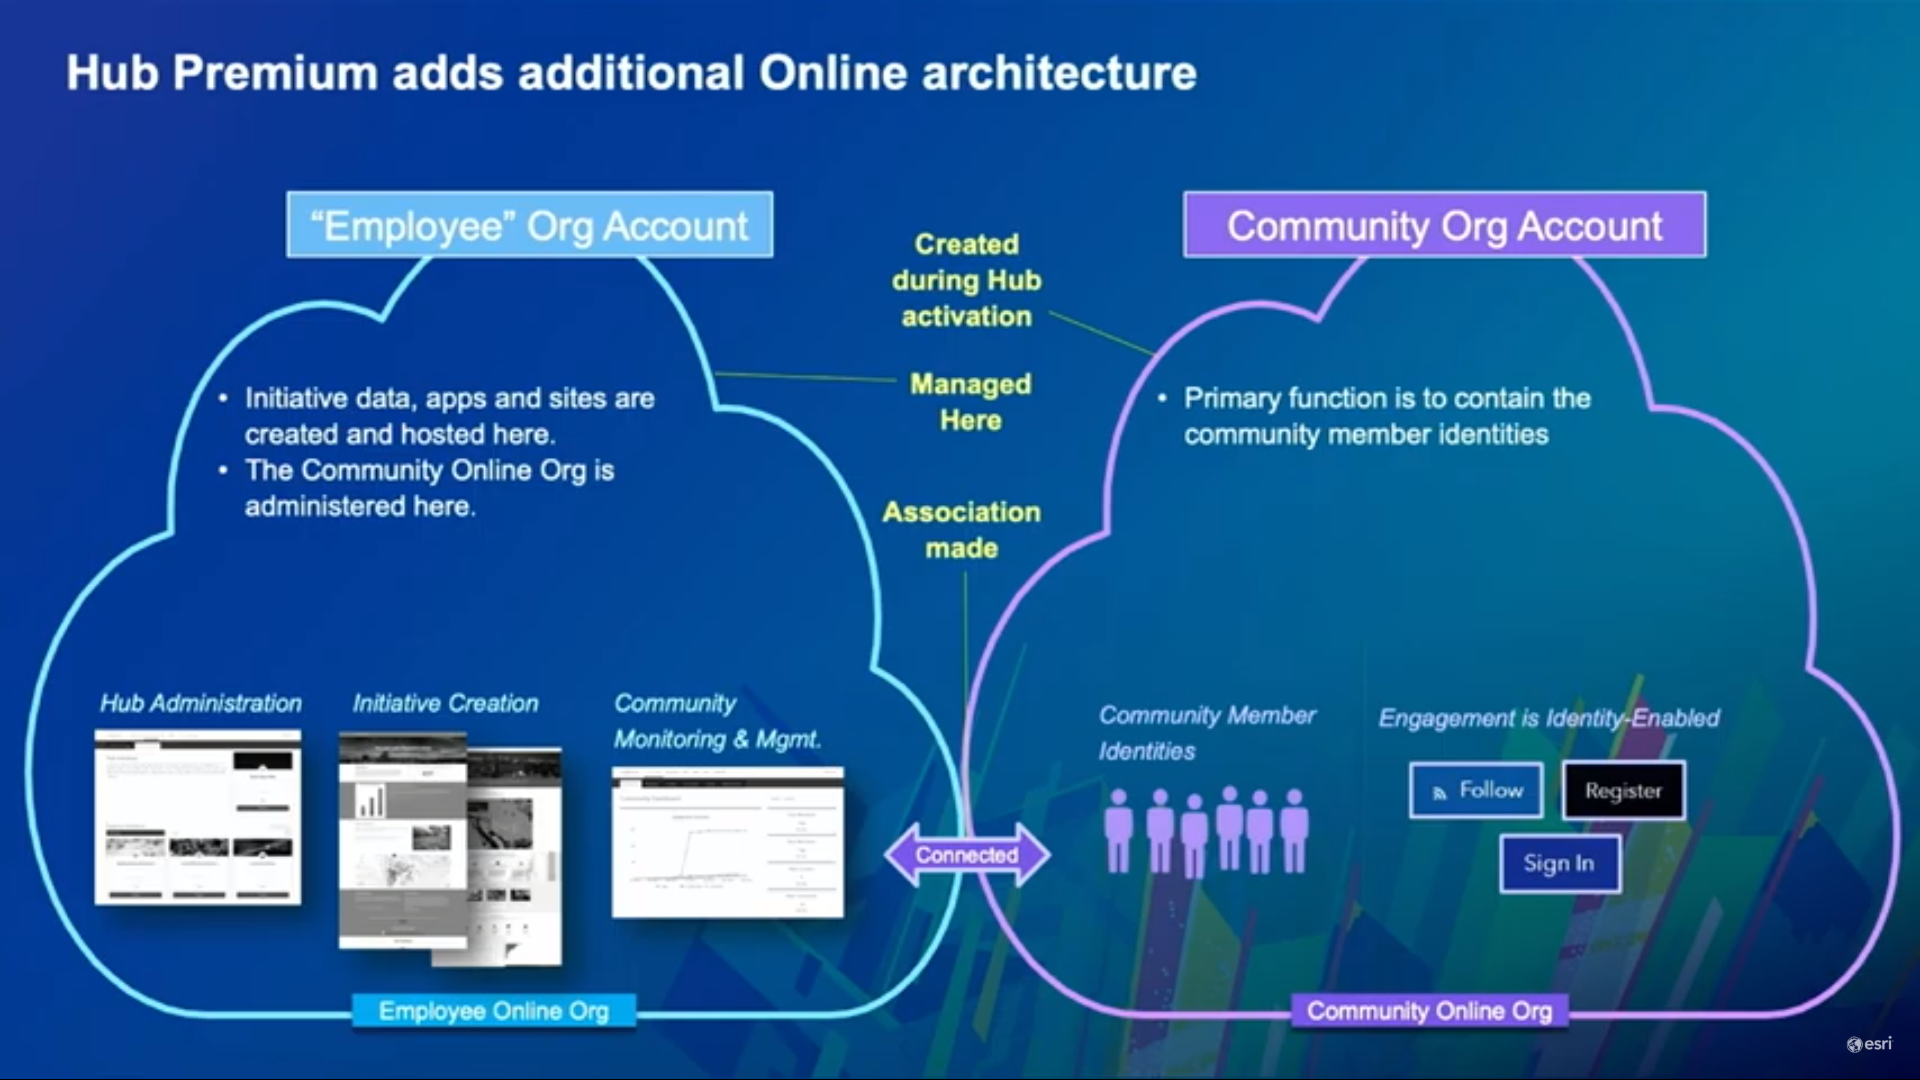
Hub Premium
Hub Premium provides extra features including Community and Employee organizational accounts, Hub Premium cards (Follow & Event List), and additional improvements like email-based account creation, a seamless login process, and a new sign in experience for Hub-aware ArcGIS Online accounts.
Coming Soon to Hub
In addition to the new search experience (recently released), be on the lookout for the new global navigation bar to connect all sites together, further header customization options, and HTTPS enforcement for your custom domains.
Get Support
Do you need assistance building your first Enterprise or Hub Site? Have another of our professional services in mind? Reach out to our industry experts to start a conversation about your unique needs today.